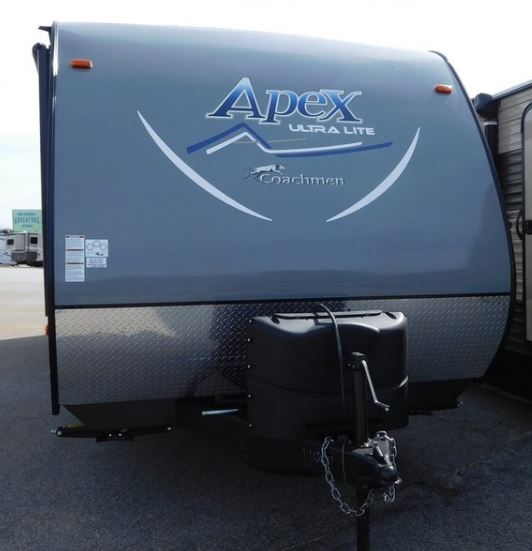
2017 Coachmen Apex Limited Edition 28LE

bob1

An Apex Travel Trailer does not just start off as a frame, walls and roofs… it begins with an idea! Our belief is that getting the little things right is a BIG THING! The Apex is not like other lightweight trailers… it is much smarter because we set new, higher standards for this innovative, truly lightweight trailer.

What makes an Apex smarter? Quality – Lightweight – Innovation – Eco-friendly – Design.

Each and every Apex model must achieve high scores in each of these standards in order to earn the Apex seal of approval. Our rating system is gathered and driven by the end user… you the customer… in order to produce a quality and most customer friendly lightweight trailer on the market!

How To Start a Campfire

img5

When you hear the word “camping,” a swirl of pleasant images immediately comes to mind. But perhaps the most iconic is the welcoming campfire.

More than just to ward off the chilly night, a campfire is a place where family and friends gather to lounge and chat, roast marshmallows, or simply stare into the glowing coals and let the mind wander.

But before you can reach such nirvana, you should know how to start a campfire. And really, it’s not that hard…

STEP 1: Gather Your Tools

There’s a bit more to building a great campfire than simply placing a few logs in a heap and tossing on a match. Here’s what you’ll need:

Tinder—the smallest and easiest burning materials used to get a campfire started.

Kindling—the next step up in size. Usually twigs or small branches between 1/8 inch and 1/2 inch in diameter.

Firewood—the crown of an inviting campfire. Firewood can vary anywhere from 1 inch to 5 inches in diameter. It can be whole logs, or split down from larger pieces. It’s important that your firewood is completely dry in order to start easily and stay lit.

Important Note: Don’t break branches off trees for firewood. If everyone did this there wouldn’t be any forests left. Some forest management agencies permit you to pick up fallen limbs but ask first.

Matches or a lighter—how else are you going to get your campfire started? Common stick matches are fine, although gas lighters used for starting BBQ grills are gaining in popularity.

STEP 2: Build the Fire

Before you can start a campfire, you have to build it first.

If your site has a fire ring, you’ll probably have to push the ash and charcoal from previous fires to the outer edge of the ring to give you enough room for the new fire. For ashes that are stone cold, consider shoveling them into a plastic trash bag for proper disposal later.

If you have to create your own fire pit, clear away any dead grass or vegetation for 8 to 10 feet around. You want bare dirt. Then dig down into the cleared soil several inches and set the loose dirt off to one side for use in case of emergency. You can mound the dirt around the sides of the pit to act as a firewall, or place large rocks around the edge of the pit to insulate the fire.

Next, at the center of the fire ring, lay a bed of tinder perhaps a foot in diameter. (Remember, tinder is the really light, quick burning material.)

1. The Teepee Fire: This style is good for cooking. First, arrange your kindling in teepee fashion over your tinder. Then build a larger teepee of firewood over the kindling. When lit, the flames will rise up through the kindling and into the larger wood.

2. The Lean-to Fire: This style is also good for cooking. Start by sticking a long piece of kindling into the ground above your tinder at about a 30-degree angle, with the other end of the stick pointing into the wind. Then lean smaller pieces of kindling against both sides of the longer piece to build a tent. As the kindling catches fire add more, followed by your firewood.

3. The Cross Fire: This is ideal for a long-lasting fire. Start by laying your kindling over the tinder bed in a crisscross fashion, followed by your logs or firewood.

4. The Log Cabin Fire: Another long-lasting fire. Begin by creating a kindling teepee over your tinder, then lay two logs on either side of the cone. Place two more logs on top of these to form a square. Then build up using smaller and shorter pieces of firewood until you’ve formed a cabin. Top off the cabin with some of your lightest kindling.

STEP 3: Light the Fire

Now it’s time to enjoy the results of your labor. Remember to keep children and pets safely away, then light your tinder. For best results light the tinder from several sides. Don’t squirt charcoal lighter fluid into a fire; flames could travel up the stream and burn you. And NEVER use gasoline!

Once your campfire is established, feed it with additional wood as needed, taking care not to build the flames too high. Be sure to keep your fire extinguishing tools nearby, and never leave a fire unattended, even for a moment.

Putting Out Your Fire

Once the evening is over, it’s your responsibility to put your campfire out completely so give yourself plenty of time to do the job right.

Start by sprinkling—not pouring—water onto the flames or coals. Don’t flood the fire ring or pit as you or the next camper will want to use it later.

As you sprinkle, stir the embers with a stick or shovel to ensure that all the coals get wet. Once the steam has subsided and you no longer hear any hissing sounds you’re just about done.

Before you head off to bed or pack up to leave, place the back of your hand just above the wet ashes. Don’t touch them as they could still be hot. Don’t feel any heat? Then the fire is out. If it still feels warm add more water and stir until the fire bed is cold.

With the proper fire ring or pit, the right tinder, kindling and firewood, plus selecting the style of campfire that best meets your preferences, you and your family can safely enjoy an evening under the stars while making s’mores.

Don’t Forget: Safety First

Safety is the most important factor when learning how to start a campfire—especially if you have kiddie campers. A 2011 study revealed that a person is injured by fire every 30 minutes, so stay alert as dancing flames have a magnetic quality that draws people close.
 

How to Take a Digital Detox Vacation

travel cell phone

When airlines first started offering Internet access on planes, there was an outcry from many folks who were connected almost around the clock and therefore cherished the precious time in the air when no one could call, email or text them. Many saw this quiet time as one of the most enjoyable elements of what were otherwise arduous business trips.

Similar debates raged over whether or not to allow cell phone use on planes. Do we really want to interrupt the relative quiet of an airplane with ringing phones and inane conversations?

Most of us know at least one person who has posted something to Facebook or Twitter along the lines of “Aircraft doors closing, stack of magazines and neck pillow at the ready,” with some sort of anti-digital hashtag.

The fact that so many folks announce delight in time away from devices and social media via a device on social media seems as good an indicator as any that there may be something to the growing popularity of digital detox vacations.

Why Do a Digital Detox?

Should I Do This While Traveling — and How?

In some respects, a vacation is a perfect time to eschew all types of digital stimulation; you are out and around, often in an entirely new environment, and have far less exposure to the moments of boredom or distraction that lead folks back to their screens again and again.

On the other hand, most of us know how helpful our devices are when traveling in an unfamiliar place. In fact, it could be argued that a smartphone shifts from a source of distraction to a superb tool when navigating new cities, finding things to do and dealing with travel snafus.

– Be ready for withdrawal symptoms
– Plan to enjoy (and not regret) missing out on what everyone else is doing
– Be prepared with things like paper maps and written phone numbers
– Set small goals (maybe a 24- or even 12-hour detox instead of a week the first time out)
– Plan something that will occupy and entertain you

This last item in particular suggests that travel might be the perfect time to try a digital detox; spending your afternoon snorkeling can make it really easy to skip fitful checks of your phone.


6 Quick Tips for RV Beginners

Miles-RV-BG-Slider1.jpg

Whether you’re a family of weekend campers or a retired couple looking to travel full-time, every RV beginner has to know a few important things before making the maiden voyage. Here are six quick tips to consider before you pile in and head out.

Tip 1: Decide Whether to Buy or Rent

This isn’t always an easy decision, with pros and cons for both. However, when you consider a few key factors, the answer becomes clearer.

  • Buy: You plan to go RV camping often or full-time and you have storage for the times when you aren’t traveling.
  • Rent: You plan to go on a single trip, or want to test the waters before making a purchase.
Tip 2: Get to Know Your RV

With little road experience, it’s especially important that RV beginners take time to learn how the motorhome works, even if it’s just a rental. If something breaks, you should be able to assess the problem, and potentially fix it. This saves time and money spent at a mechanic. Continue reading

How to Park an RV

yosemite_valley_3

You’ve finally made it to the campground. But before you can run off to the lake or go for a hike, the first order of the day is to park and level your RV so that your refrigerator will operate properly and you don’t find yourself in bed at night with your feet higher than your head.

Never assume your site will be flat or level. That would make parking an RV too easy. Due to the nature of camping, chances are higher that your site will be rutted, gouged and somewhat uneven.

But don’t fret. You can still get your RV into your spot, and leveled so it operates properly, with a few easy steps. Here’s how:

How to Park an RV

With many campsites designed to accommodate smaller vehicles, easing your 30-foot long fifth-wheeler or even longer motorhome into some spots can be a challenge.

That’s why it’s important to:

  • Verify that your RV can get to your campsite. While the roads in most campgrounds are easy to navigate, there are still some that could be difficult to access due to hairpin turns and tight squeezes among boulders and trees. Some camping websites post caution notices to warn owners of longer rigs that they might want to consider another campground. If such warnings don’t appear on the website and you have concerns, contact the campground directly and ask.
  • Make sure your rig will fit the campsite. Most campground reservation websites provide details for each site, including its length. Check that the spot you’ve selected will accommodate both your tow vehicle and your trailer, or your motorhome, without sticking out into the road. Some reservation sites will also indicate low hanging tree branches or other obstructions.
  • Check the campsite before you pull in. If you can do so without blocking traffic, get out and look the spot over. Scope out any objects or terrain that might pose hazards, such as drainage ditches, roadside markers, low hanging branches, posts, and power and water hookups. These same obstacles can prevent you from extending slide outs, so make sure you have clearance. Also, check to see if there are any especially low spots in the site that you’ll want to avoid.
  • Have an assistant guide you in. No matter how skilled you think you are at backing into campsites, things will go a lot smoother with extra eyes watching. There’s nothing worse than the embarrassing crunch of an RV bumper kissing a large rock or a picnic table. Your helper can also make sure you’ve got the rig in straight and that you’re completely out of the road. For easier communication, get yourself a pair of two-way radios so you and your assistant won’t have to yell.

How to Stabilize Your RV

RV.jpeg

After your RV is leveled, you’ll want to stabilize it so it doesn’t rock back and forth when you walk around inside. You should use stabilizing jacks to accomplish this.

Note: These should never be used to level a rig, as they weren’t designed for that purpose.

Stabilizing jacks come in several configurations. The most common is the scissor jack, which is usually bolted or welded to the trailer’s frame at the front and rear.

Pop-up tent trailers are frequently equipped with a drop-down style jack, which, as the name implies, drops down from the frame.

To use the stabilizing jacks after you’ve leveled the RV:

1. Lower the jacks following the manufacturer’s instructions. To save time and give the foot of each jack a larger base, slide a couple of short 2×4- or 2×6-inch boards beneath each foot. This is especially helpful if the ground is loose or sandy.

2. Once the jack foot is in contact with the ground, give the crank a few extra turns to provide the trailer a secure footing. Check the bubble level to make sure your RV remains level. Do this for all four corners.

6 Things to Ask Yourself When Buying an RV

Top-of-the-Valley-Sites_1920x645_60.jpg

Is the road calling? Are you ready to explore the beauty and wonder of America from the comfort of your very own RV.

While the phrase “recreational vehicle” usually brings the iconic image of a luxurious motorhome to mind, there are actually seven types of RVs to choose from, each suited for different needs or uses.

So, when buying an RV you should ask yourself these six questions in order to choose the right one for you:

What Type of Camping or Travel Will I Do?

For many, a camping adventure can be as brief as a weekend, while others will opt for a few weeks at a time. And for the more enthusiastic (and fortunate) “full-timers,” a real road trip is nothing less than several months…or forever!

Other considerations to keep in mind are who will be traveling with you and how many “essentials” you’ll be taking Continue reading